Important! Please read the announcement at http://myst.dustbird.net/uru-account.htm
Also! Please read the retirement announcement at http://myst.dustbird.net/uru-retirement.htm
Light Maps
Lighting up my Age........what a drag......
Yep. I think as far as modeling and texturing goes, this is one of the hardest things to get to work right. Part of the problem is that many of us are used to the idea that when you paint something on a canvas, that what you see is what you get. However, as far as making Age's goes, What You See Is NOT What You Get, at least as far as the 3D window in Blender goes. You can get things close, and while I've seen several people claim that their Ages look just like they want in Blender, that's not true as you can not see the fog from the .fni file, or will you see your particles working, and several other things. The only time that you will actually See What You Get, is if you export and link in.
There are many out there who make an Age that is a day light scene and make it quite beautiful, without the aid of light maps, and indeed through the use of textures, vertex painting and a few lamps acting as the Sun and as back drop lighting.
However, what happens when we enter a cave? A house? Somewhere, where natural lighting is not enough? This is where many people start to run into a problem, and where lightmaps can help. You will find that Cyan used lightmaps too, especially in the Training Center in Gahreesen.
Contents
Lights......relearning what you know....
First, lets reintroduce you to lights.
In real life, if I plug in a light bulb and turn on the light, photons stream out from the light bulb and will bounce off objects and into your eyes for you to see those objects. How bright things appear, and how strong shadows are will depend upon the strength of the light bulb. Also, how the light is presented. If the lamp with the light bulb does not have a shade, we have this glaring light. Put on a shade, and now we have the photons being directed more up and down.
That's real life. That NOT how it works in Blender for you.
Each lamp that you set up in Blender is not a real light bulb with photons streaming from it, and bouncing off your objects to your eyes. Instead, it represents a point at which, IF there was a lamp there, and based upon it's setting how much it will light up a texture or not, from what direction and what shadows are cast.
Now, if you've ever used Blender (or other 3D Modeling programs) you KNOW that when you put in your lights, adjust their energy, direction, etc, etc, etc, that those lights Work! So why da heck do they NOT seem to work in your Age?
It's because of the way Plasma (the Uru Game Engine) works. It's a Real Time Rendering Engine. When you render a scene in Blender, you're making a picture. You can make it look perfect, and even as though it's a photo from the real world. Some of these renderings can take hours to produce. But in Plasma, everything we see on our screen in Uru is being rendered right there in front of your eyes as you look, move and turn. We can't use real time data about light and how it affects every object in your Age . If we do that, the result will always be the same: crashed game or locked up computer. It's just TOO much data, even for very high end systems.
So what we do is.........cheat!
Light the texture, not the light...
So this is how we "cheat". Since how an object looks to us is how much light is falling on it (and then returning to your eyeballs), let's just make the object LOOK like it would IF it had light shining on it! This allows Plasma to only worry about presenting the geometry of the object, and it's texture you put on it. It's not trying to light it up with an object either and present a dynamic light to you. Plasma [i]can[/i] do that, IE Teledahn, but that's just one light moving around. If you were to import Teledahn into blender you will see all sorts of other static lights for the avatar, and lightmaps for making the Age look lit up.
The first thing you need to do is to create the area that is going to be affected by lighting, and all the objects that are going to be there. In other words, making lightmaps and putting in lighting should be towards the end. If you add lightmaps too soon, and add objects later, you'll be missing important shadows.
I'm not going to go into how to make a texture, or how to vertex paint it. Those would be other tutorials. For this one, I'm going to assume that you've made your models and you have them textured and UV Mapped. Once you've done all that, you will be ready for lightmaps.
Starting out....
All a lightmap is, is a texture that acts as a filter for how bright your object will be, based upon what lights you used to make the map in the first place. Unlike stencils or Vertex painting, Black will be the total absence of light, where as the brighter areas represents how bright it will be.
Okay, you'll need to put your light(s) in. How do you set them up? That's a good question, and one that I can only [i]advise[/i] you on. Depending on the kind of light will make a big difference on how your light maps turn out. Let's say you have hanging lamps. In that case I would use a spot light with the cone facing downwards. This will make a circular light splash on the floor and cone shapes on the wall (if your walls are within the cone). In my example that I will use here, I used just a regular lamp, that gives off light in 360 degrees all around. Position of the light will affect things too. Mostly you will have to do some trial and error here. I still got through that myself, so don't worry too much about that. You should leave the distance setting at 20 blender units however. I've found that playing with that is not a good idea.
Try giving the Quad setting at about 0.02, and set the energy low, around 0.15. I've found, that unless you are working with your "sun" you'll want the energy quite low. It ends up impossibly bright in Uru after 0.3 for interior lights.
Okay, lets give making light maps a go:
Where's the darn pictures to show me???
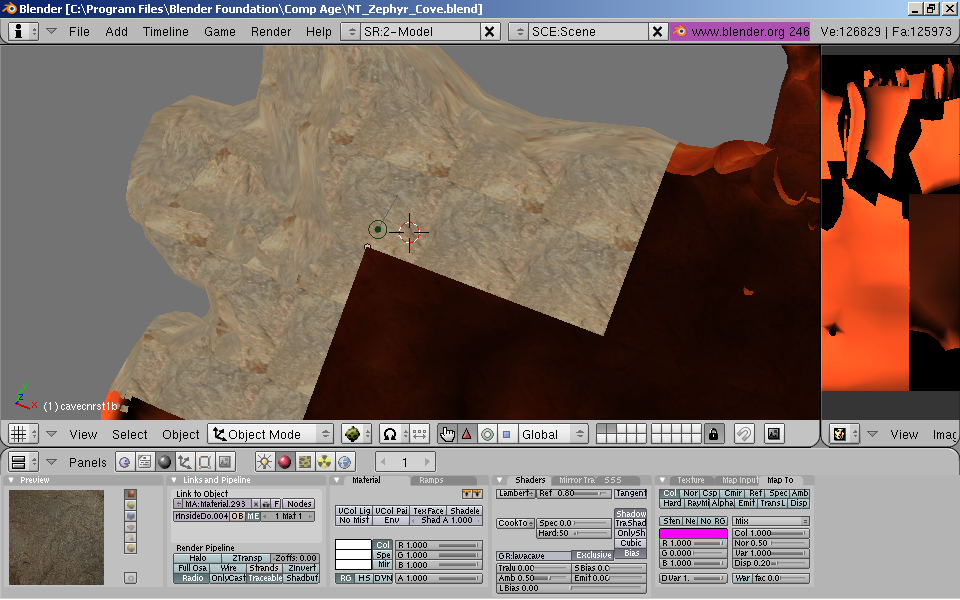
Okay, here is a pic from Zephyr Cove. This is one corner of my lava cave. As you can see, I have the object modeled, gave it a material and texture, then UV Mapped that texture. I've also put in a orange lamp. Settings for this lamp is Quad 0.02 and energy is 0.15
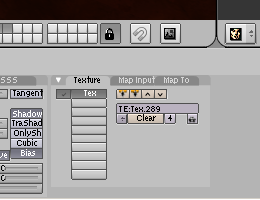
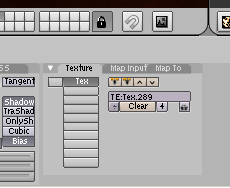
Now, while in Object Mode, go to the Materials lab, and click on the Textures Tab. You want to REMOVE the checkmark that is in your texture. This is IMPORTANT so DO NOT FORGET TO DO THIS!!!
So now it should look like this:
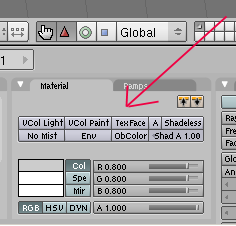
Now, another IMPORTANT thing is the Shadeless button. DO NOT HAVE THIS TURNED ON! With this button on, lights have NO EFFECT ON YOUR TEXTURES.
So your panel should look something like this:

Shadeless is off, the texture is UNCHECKED (and you can't see it in the little window anymore).
EDIT: 11/7/2008 This was not mentioned before, because the buttons are normally defaulted to off. If you have turned any of them on, you MUST turn them off while baking the light map, or your light map will not render correctly (it'll be all black):
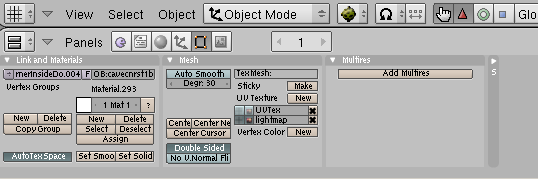
Next, go to the Edit Panel (NOTE: WHEN I SAY "PANEL" I MEAN USING THE LITTLE BUTTONS. WHEN I SAY "MODE" THAT'S THE DROP DOWN MENU!! SO CLICK ON THE LITTLE BUTTON WITH THE 4 ORANGE DOTS MAKING A SQUARE. THAT'S THE EDIT PANEL. NOTE HOW IN THE DROP DOWN MENU WE'RE STILL IN "OBJECT MODE")
In the Edit Panel, click on the little "New" button under UV Texture. This makes a 2nd UV layer. When it pops up. click on the two little squares next to it, and then click on it's name, rename it something else. I always call it "lightmap"
You don't need to name is something different for each object. You can call it "lightmap" for each object because it's only going to affect THIS object. not some rock 50 feet away.
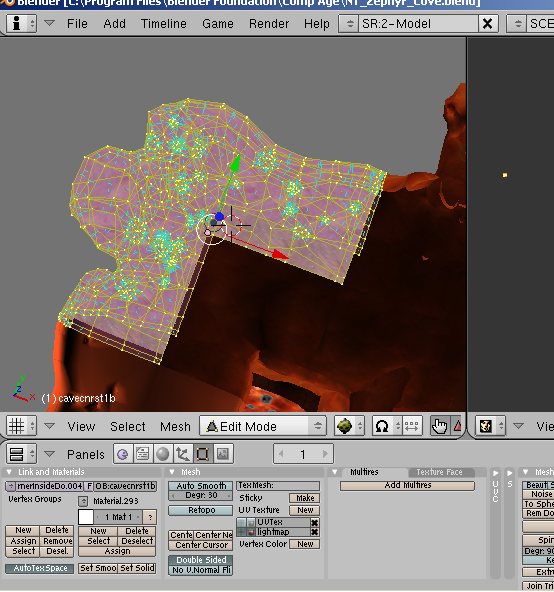
Once you've done that (and I HOPE you clicked on those two little buttons by the name, 'cause if you didn't you're fixing to screw yourself up here), go to Edit MODE.
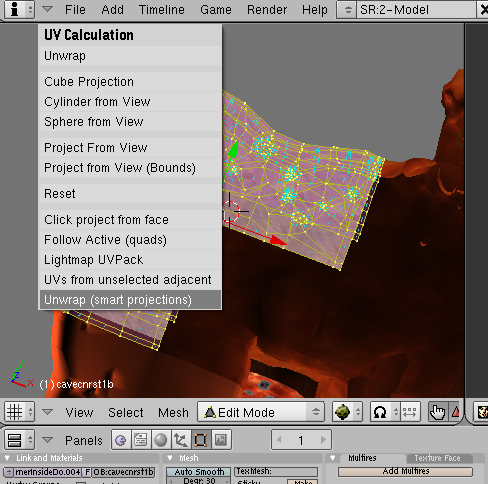
Make sure all the faces of your object are selected by hitting the A key a few times. Then, with your mouse in the 3D window, hit the U key to call up the Unwrapping menu.
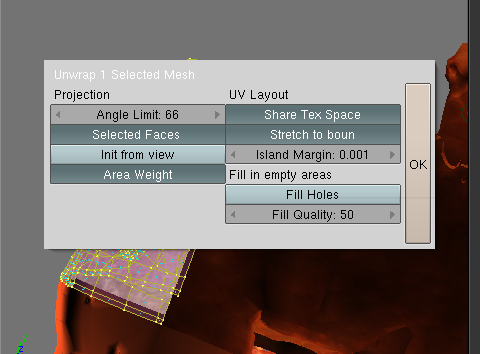
Select "Smart Projections" on the bottom. A new box will appear.
In the new box, change the Island Margin to 0.001, then click on Okay. What this does is unwrap your object's faces and lays them all out so that they all fit on to one picture. This is IMPORTANT.
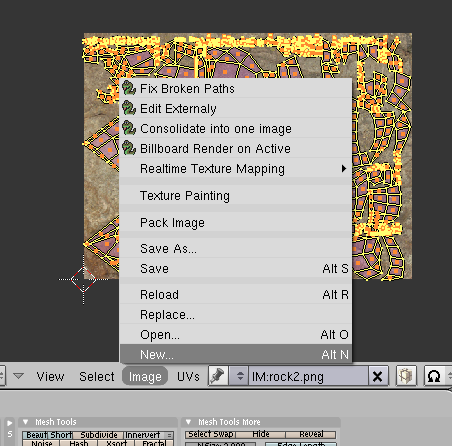
Now make sure that one of your windows is in the UV Editor, where you do your UV mapping. Go to it and make sure ALL of the faces are selected by hitting the A key a few times. Then click on Image in the menu and select NEW.
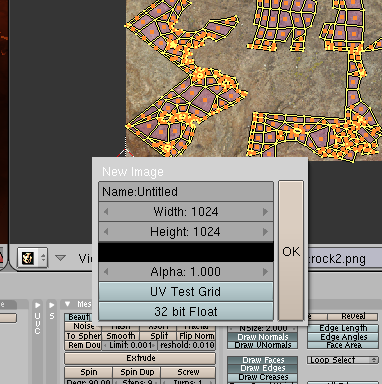
Now a new box will pop up, asking you how big to make the picture. That's right, we're making a picture....of light!
For really large objects, I would recommend making it 1024 x 1024. When you get to smaller objects, like a chair, or a book, you can go down to 256 x 256. Just remember: the bigger the picture, the higher the resolution, and the smoother your shadow edges will be. Use a 256 x 256 for a large tunnel and you'll have jagged edges for your shadows.
Now that you've picked the size, go back to Object Mode!!! And now go to the Scene Panel. It's the little button that looks like a picture. It should call up this panel here:
There's only one button here that we are interested in: Bake. click on it.
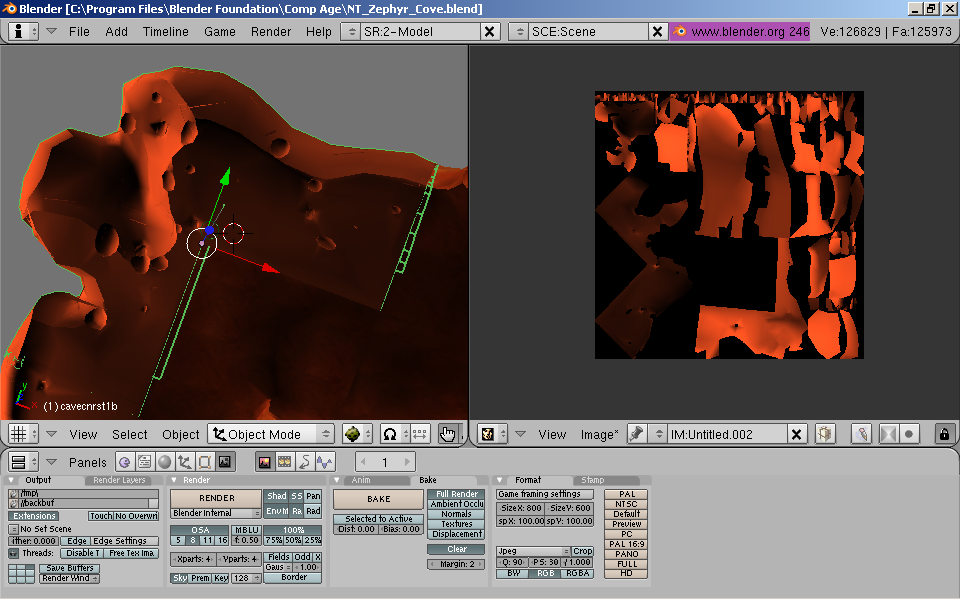
Depending on the size of your pic, and complexity of the geometry of your object, baking can take anywhere from instant to up to a full minute. You'll know when it's done, as you'll have a funky looking picture in your UV Editor window, and your object will suddenly look lit up with light and shadows.
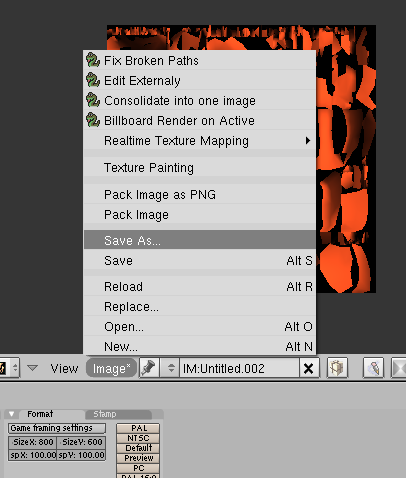
Now, you must save the picture. If you do anything else at this point....you'll loose it! So go back and click on Image in the menu of the UV Editor, and click on Save As
Don't just type in a name quickly and hit save! Make sure you are in the directory that you normally have your textures in. Call this picture something important. I normally call mine after the name of the object, followed by "ltmp" for lightmap.
EDIT 3/17/10: With Blender version 2.49a, you can save the file in several different formats, where as before with earlier version of Blender, you were forced to save it in .tga format.
I recommend you save it in .png format, but then remember the idea is to keep the file size as small as you can so your texture prp file does not end up huge in size.
It will save your picture in the format of your choosing.
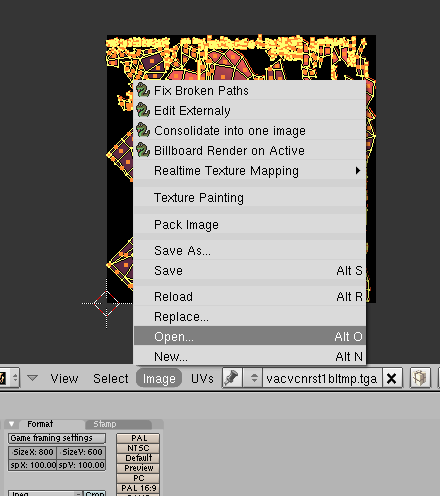
Go to Edit MODE and go to the UV Edit window. Click on Image in the Menu and click on OPEN:
Moving along......
Okay, back to business.....
Now, go back to Object Mode, and go to the Material's Panel. Put a check mark BACK on your original texture! Now go to the Textures Panel and create a 2nd texture:
Select the image that we made (the png file) of your light map. Then go back to the Materials Panel
Go to the Texture Tabs. Make sure you have our new 2nd texture picked. Then click on the Map Input tab. Select UV button, and then in the UV: box, type in the name you gave the 2nd UV Layer, remember, I called mine "lightmap" so that's what I've typed in. If you called yours "Snoopy" that better be what you type in.
Last, click on the Map To tab. Find the little box that says "Mix"
Click on it, and change it to "Multiply". Also, if you are using at least version 1.5.0 or higher of the plugin, click on the little Amb box too:
That's it peoples......
That's all there is too it. As you do more of these, you start doing it from memory without even thinking about it. Remember, one thing however: look at this pic:
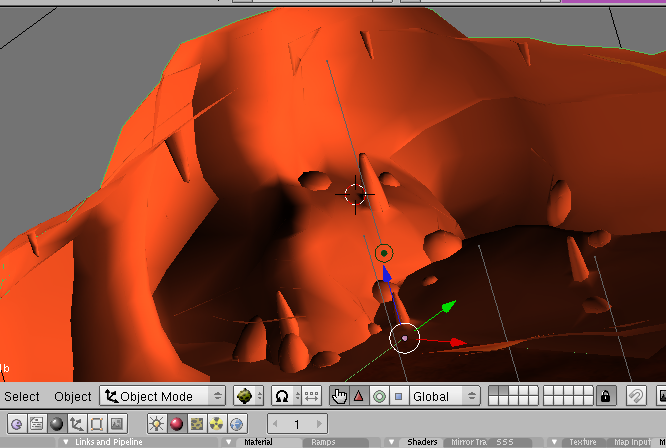
As you can see, in the 3D window, all I can see is the light map on my cavern corner here. If I switch to the other UV Layer, I'd see the texture without anything on it, raw. Again, Sorry, but we don't have What You See Is What You Get. However you can get a good idea of how it's going to look once you export and link in by looking at the light map.
So what are you waiting for???? Go ahead and export, and then link in and take a look!
Return To: Andy's Blender Tutorials
