Important! Please read the announcement at http://myst.dustbird.net/uru-account.htm
Also! Please read the retirement announcement at http://myst.dustbird.net/uru-retirement.htm
Dustin's Second Tutorial
I think these might not work perfectly with the newer Pyprp versions, but they're here for posterity :P
Dustin's Second Blender Tutorial
(it assumes that you know the Blender basics).
I've found some tricks for making a landscape and having the lamps automatically paint it, so that it looks like lamps are shining on it!
As always in Blender, because the undo system is terrible, you should save it whenever you like what you've done, and save under a different name every once in a while, in case you have to go back.
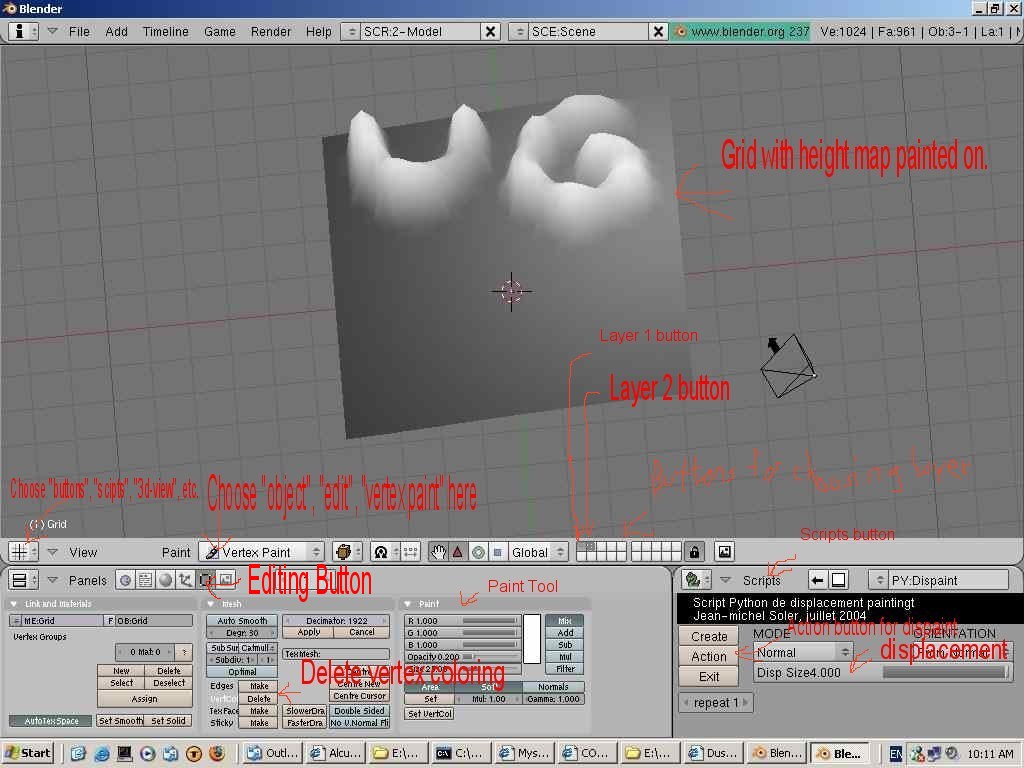
Here is an awful picture of what I'm talking about

- In a 3d-View window, go to "view"->"top"
- Add->Mesh->Grid and choose the number of vertices(e.g. 100x100) You'll want this to be large enough to support the whole area of the Age.
- The mesh may need resizing(use the "s" key)
- In a "buttons" window click the "editing" button, and look at the "Paint" section.
- Choose the white color from the Paint Tool
- Change the mesh's mode from "object" or "edit" to "vertex paint"
- Remember Stratovision? Paint the height of the various parts of your landscape on the mesh.
- If there is some grey on the mesh already, paint it black first.
- You'll probably want to use "mix" or "add" at this point.
- Size is the size of your paint brush.
- Opacity is "how hard" you're pushing on the brush, check out what different values do.
- "Area" and "Soft" should be turned on, "normals" off, and you can change the gamma if you know what that is(it allows you to adjust for your monitor, but you probably don't want to use it.)
- Make one of your windows a "scripts" window.
- Choose Scripts->Mesh->Dispaint which stands for Displacement painting
- save, Click "action" to make your mesh a terrain! If it exaggerated too much or too little, you can undo(or reopen) and try a different DispSize. Or you can use "action" multiple times.
- It currently has the height colors painted onto it, so we'll want to remove the current paint:
- Go to a "buttons" window and click the "editing" button. Then, in the "mesh" section, click on "VertexColors: Delete"
- Now make sure that both layers are visible(the one with the mesh, and the one with the lamps. Do that with the grid of 5x2 plain buttons on the menu bar. Hold down "shift" and click the ones you want.).
- select the mesh and change the mode to "vertex paint" and it should be painted by the light!
- Now you'll want to paint the colors over top of the light.
- Go to a "buttons" window and click the "editing" button. Then in the "paint" section, choose "Add"("Mix will just overwrite the light info.).
- save, Paint away!
- If you want to cut down on polygons:
- Go to a "buttons" window and click the "editing" button. Then in the "mesh" section:
- Set the "Decimator" number to however many triangles you want. Save first, then you can try some different values. Click Apply. This may take a moment to compute.
This produces excellent looking terrains without the use of textures!