Important! Please read the announcement at http://myst.dustbird.net/uru-account.htm
Also! Please read the retirement announcement at http://myst.dustbird.net/uru-retirement.htm
Animated Textures
Waterfalls are a great example of an animated textures in Ages. The object itself is not moving. The texture instead is sliding across it.
We have the ability to make textures move around on the face of an object. It's not too hard, but it does require you to already know how to model and basic texturing in Blender.
Understanding Some Basics
There are some basic things you should understand before plunging ahead here:
Frame Rates: The very first "Moving Picture" cameras took several photographs of something in motion. The photographs were put in sequence and then show quickly, one after another. How fast each picture or "Frame" was show, would depend on how fast the object moved.
Way back during the Silent Movie Era, cameras used to film the movie were driven by a hand crank. Now you know why Charlie Chaplin and others seemed to move quite fast at times. Later, technology evolved and movie cameras were given motors who's speed could be set. The motors gave the filming a constant speed and never tired of course. That's when old Black and white moves started to show normal motion.
Now come back to the present. We're messing with software here, not a movie camera, yet the principle applies. You will be telling Blender how fast something moves.
By default, Blender has it's frame rate set to 30. This means that if it were taking pictures, it would take 30 pictures in 1 second. Knowing this is important, not just for animating your textures, but your objects too. If you need something to move across something in 3 seconds, you'll need 90 frames.
If you need something across in 1/2 a second, you'll need 15 frames.
Understand Frame Rates?
X, Y and Z Offsets.
Okay, you should know by now that X, Y and Z are coordinates in Blender. Z normally being up and down. Offsets mean how far to move it. Normally for textures, we go from 0 to 1.0 on our offsets. 1.0 being the texture has moved all the way back to the beginning. 0.5 would be half way there. -1.0 is the same as 1.0, but in the opposite direction.
Getting Started
I'm going to use my waterfall in Eder Bahvahnin to show this. However, this can apply to any textures you want to animate.
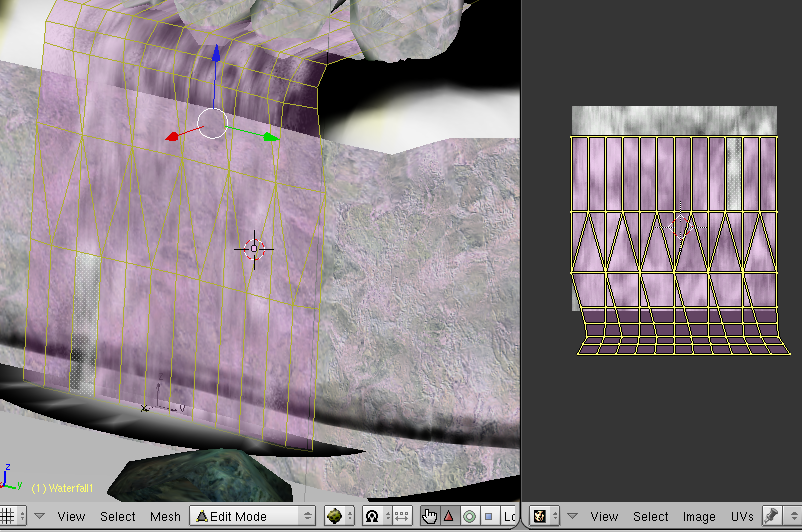
First of course, you need to build the object. In my case it was a plane, bent to the shape I wanted it:
[[File:Wat1.png[/img]
Next, you need to apply a Material and texture to it:
Then UV Map the texture so that it looks right. (yes, I know, in my case I'm using 2 textures, don't worry about that for now).
Okay, now we are set to make the texture move.
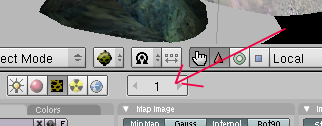
Make sure you have the object selected and that you are in Object Mode. Go to the Materials Tab, and MAKE SURE YOU HAVE THE FRAMES SET TO 1:
You can change this number by double clicking in it and typing in the number you need.
Now you need to think: How fast? How fast is the texture suppose to move? If this were a marquee sign, you'd want your letters to only move so fast, else people can't read it. In my case here, it's water falling. So basically it's speed is the gravity constant. Fall from high enough and you'll reach terminal velocity for Earth which is 120 MPH. So for a water fall, yah, fast.
For me, I wanted to make the water flash by in about 1.25 seconds.
Ah! But you have something else to consider......how far does the texture have to travel? If it's a HUGE mesh, that will affect the speed. Smaller will too. In my case the mesh is about 17 blender units high (17 feet).
As I said at the beginning of the tutorial, Blenders Default Frame Rate is 30 Frames Per Second or 30 FPS. So 1.25 seconds would be about 45 frames.
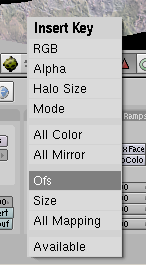
Now that the frame rate is decided upon, you need to move your cursor down in the Materials Panel, and hit the "I" key.
A box will pop up. Click on where it says "Ofs" this puts in a key for frame 1 for the texture.
Now go back to the Frame number, double click on it and change it to what frame you want, in my case I went to frame 45
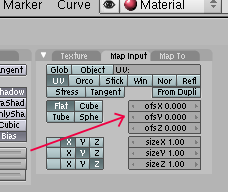
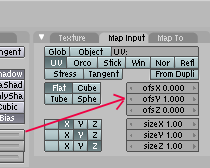
Now look down and click on the Map Input tab of the Materials Panel:
You need to look at the Xofs, Yofs, and Zofs. We need to decide which one. This is the direction that the texture is going to move:
Now, in my case, it's a water fall, so we'd want to mess with the Zofs, right?
WRONG!
Since we are messing with the texture, it's a 2D thing. There is only X and Y in this case. In your UV Edit window, you can only use X and Y for things. X is side to side, and Y is up and down.
So in MY case, I want to mess with Yofs.
Now, the number we want to put in here is 1.0. This makes the texture slide across all the way from one end to the other. The reason I used 1.0 instead of -1.0 is because of how I UV Mapped it (upside down). So type 1.0 here:
There you go! You just set up an animated texture!
If you want, you can change the frame back to 1, and click on the arrows while watching your Yofs. You can see the number changing, climb up to 1.0.
At this point, you can export and link in watching your texture....
Problems
It's going in the wrong direction!
Okay, WHICH wrong direction is it going in? If it was suppose to go up and down, but is now going side to side, you need to go back and check your Ofs, did you use X instead of Y?
It's going in the up and down direction, but it's going UP instead of DOWN!
This can be fixed two ways. You can do the animation all over and change the 1.0 to -1.0 (or vice versa),
OR
Got to Edit Mode, and the UV Edit window. Make sure all the faces are selected. Hit the "R" key and type in 180. There, you just flipped the mapping 180 degrees around.
Good luck!
Return To: Andy's Blender Tutorials


